FAQs about pixels

Overview
Having a healthy set up is important to ensure your campaigns are measuring and attributing results accurately. Healthy implementation is the foundation that our Web-DR products sit on (eg., Site Visits Optimization, Conversions Optimization).
Validating a Pixel Tag
Finding and identifying the pixel tag on your website should be the first step to conversion tracking validation. However, before identifying the pixel tag, it is important to define the different types of pixel that exist on X. So which are they?
- Base Tag: This tag is designed to be placed on all web pages to track all traffic and upper funnel events such as site visits and landing page views. See below for an example of a base tag code:
      <!-- Twitter conversion tracking base code -->
<script>
!function(e,t,n,s,u,a){e.twq||(s=e.twq=function(){s.exe?s.exe.apply(s,arguments):s.queue.push(arguments);
},s.version='1.1',s.queue=[],u=t.createElement(n),u.async=!0,u.src='https://static.ads-twitter.com/uwt.js',
a=t.getElementsByTagName(n)[0],a.parentNode.insertBefore(u,a))}(window,document,'script');
twq('config','obw0r');
</script>
<!-- End Twitter conversion tracking base code -->
- Event Tag: This tag is designed to be placed on a specific page or section of a page to track lower funnel events such as form sign ups, purchases, add to carts, and much more. Please take note that event tags cannot function without the base code firing. See below for an example of an event tag including parameters:
      <!-- Twitter conversion tracking event code -->
<script type="text/javascript">
  // Insert Twitter Event ID
  twq('event', 'tw-obw0r-obw0t', {
    value: {{order.total_price}},
    currency: 'USD',
    email_address: {{order.email}},
  });
</script>
<!-- End Twitter conversion tracking event code -->
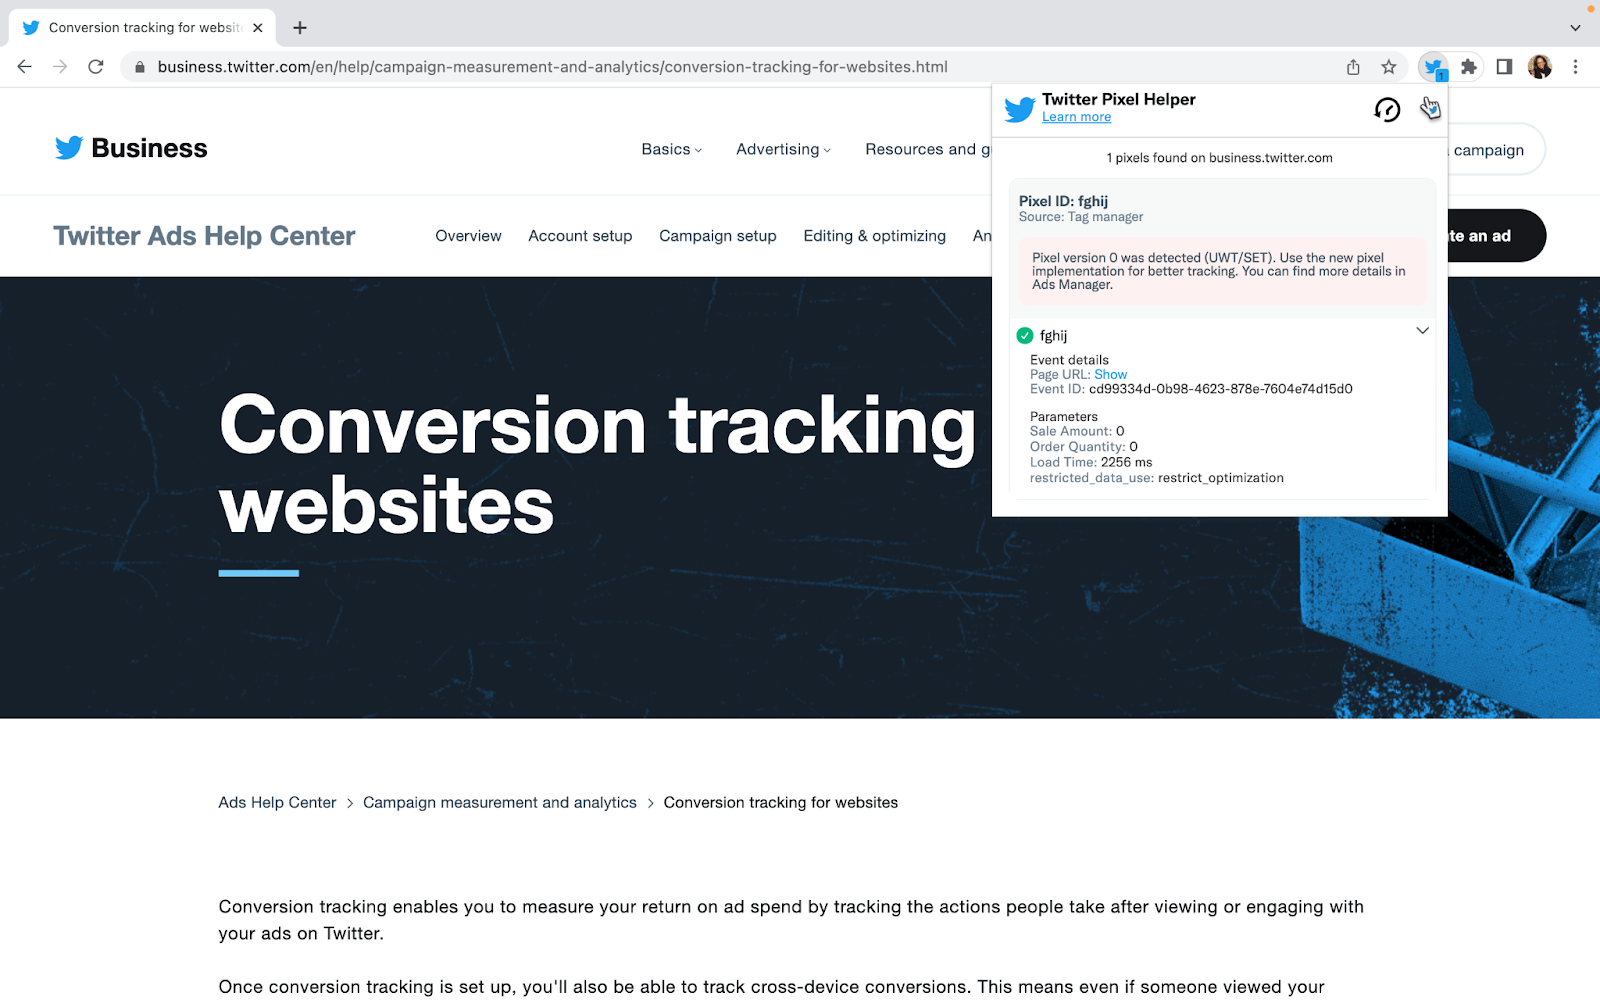
The Pixel Helper is the most common way to verify and find that a pixel is in place on a website. When using the extension you will be able to see tracking statuses of the X Pixel and relevant events. “Warnings” may trigger based on the status of your pixel.

To troubleshoot with the Pixel Helper, please follow the steps below:
Download the Chrome Extension here.
Navigate to your website.
The Pixel Helper will automatically detect any pixels that successfully send data to X. The badge number on the extension shows you how many pixels were detected on the page.
By clicking on the extension, you will see more details displayed about each of the pixels.
If you are able to see the pixel on the extension, it means that the tag was placed on the website. However, if a warning message appears, please follow our Advanced Pixel Troubleshooting to validate your setup.
Advanced Pixel Troubleshooting
For additional validation purposes, we recommend “inspecting” your website to ensure that your conversion tracking is working properly.
To access the developer/inspect tool follow the below steps on your Chrome Browser:
Visit the Website ➔ Right click anywhere on the page ➔ Select “Inspect”
Or
Click “View” ➔ Select “Developer” ➔ Select “Developer Tools”
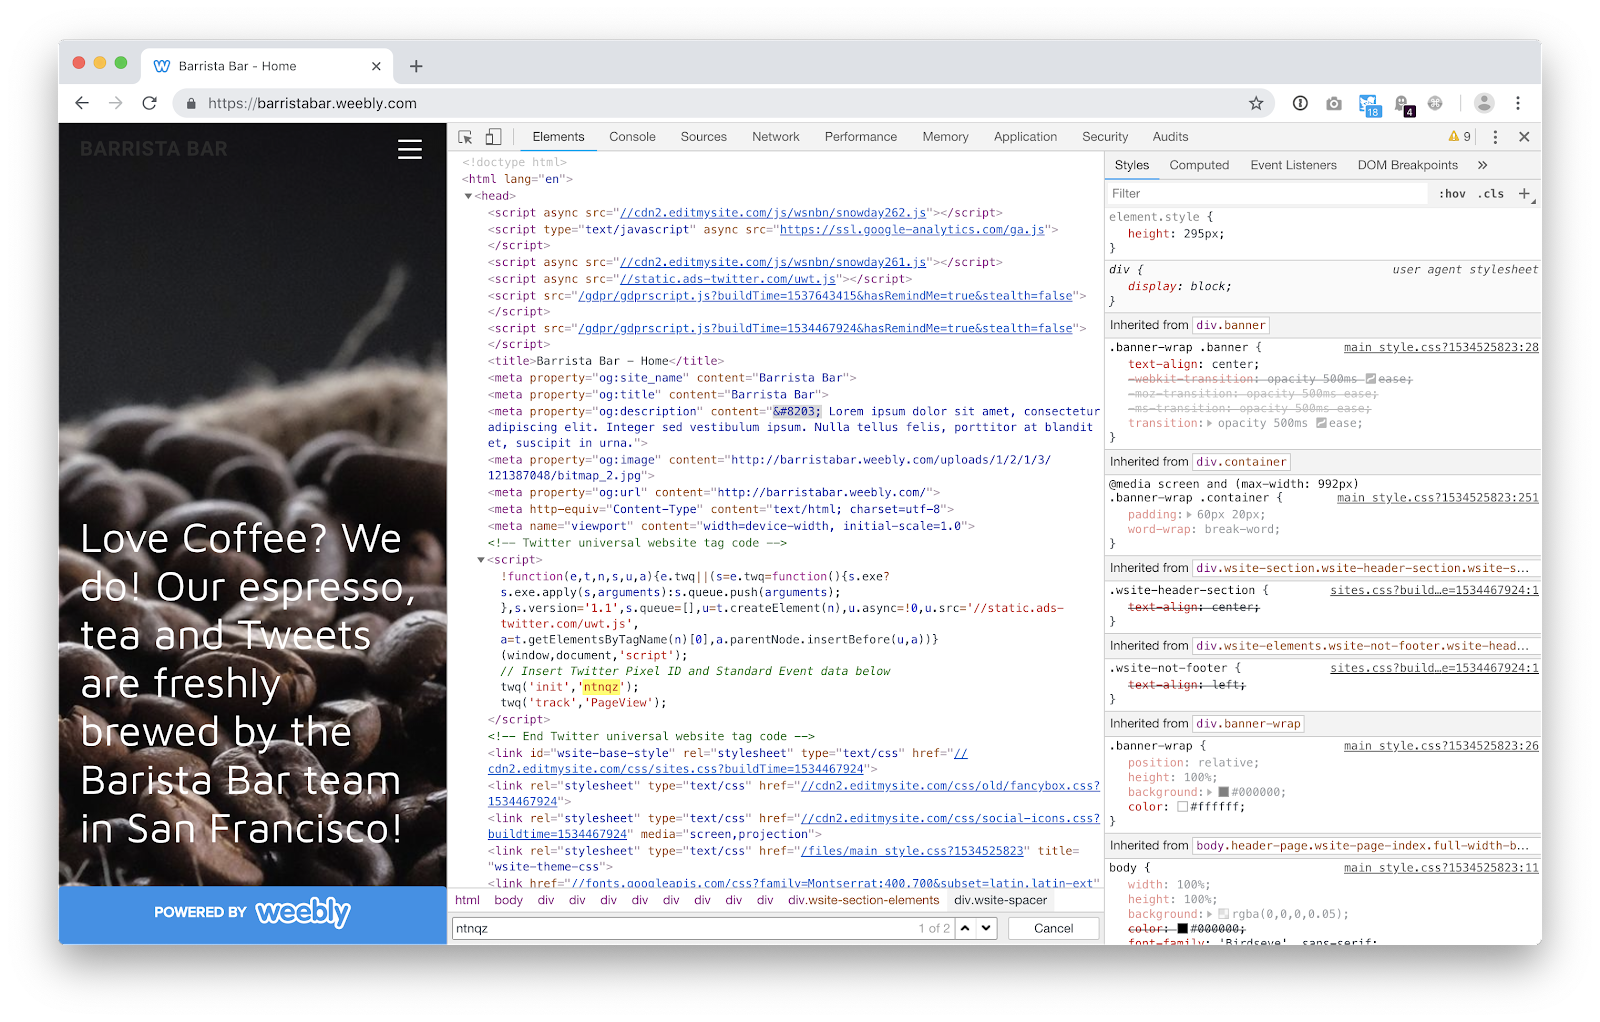
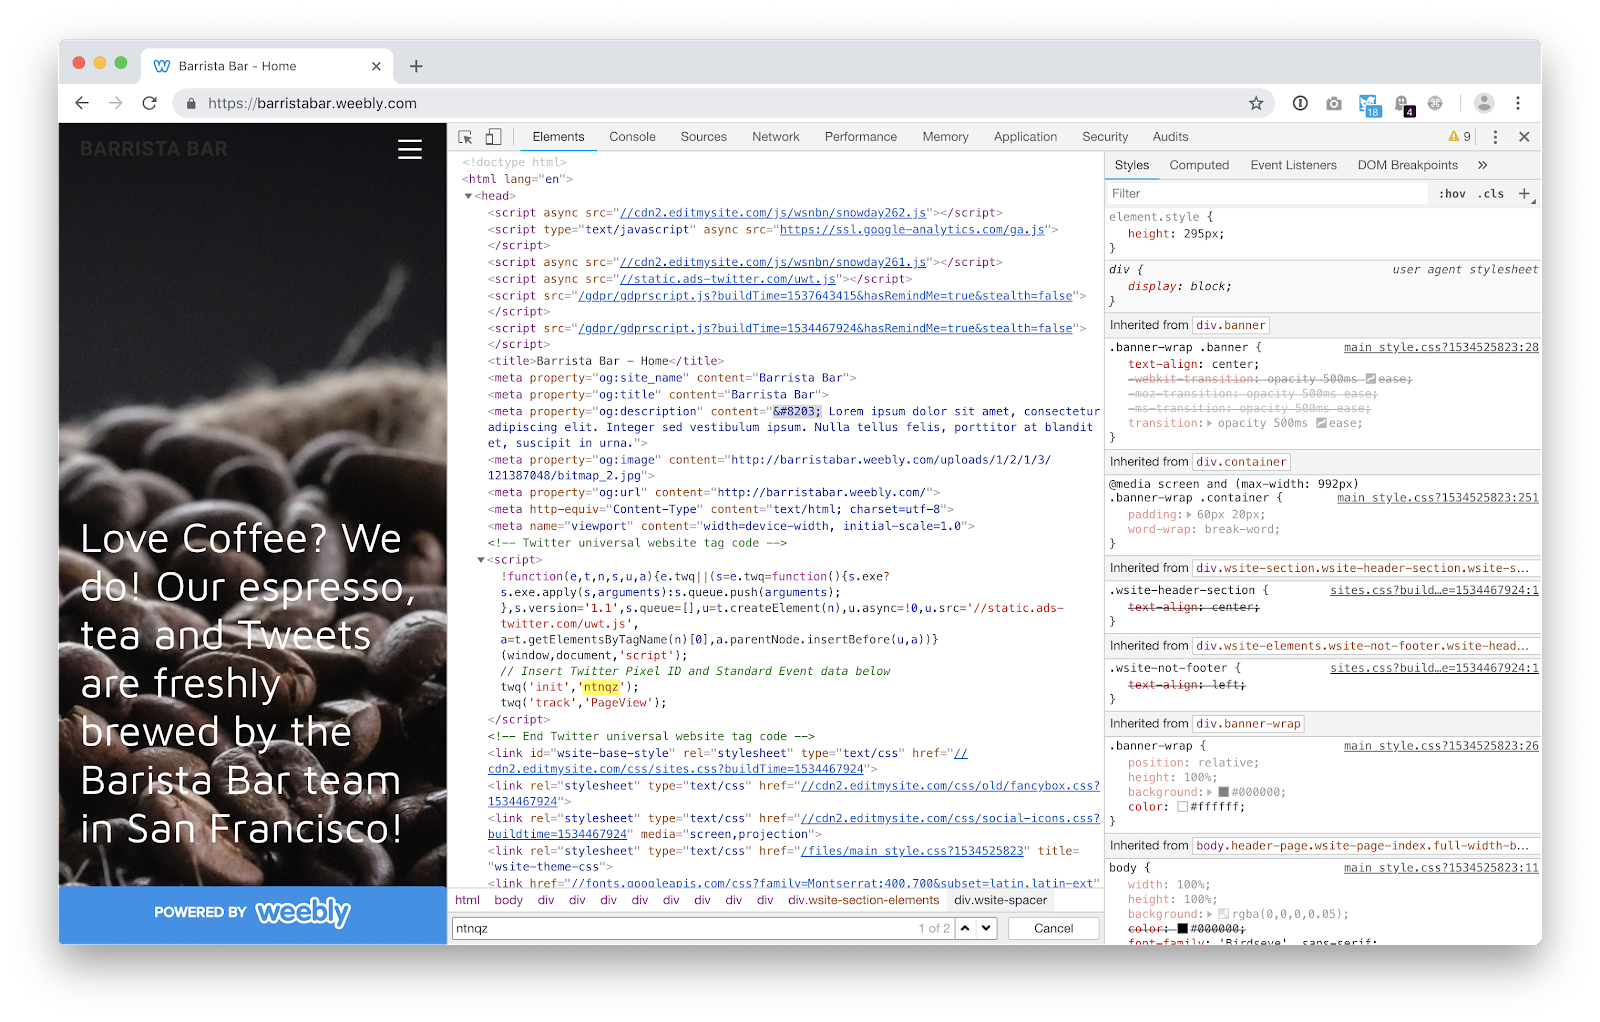
By following these steps you will be able to see the HTML source code of your website. You should be prompted with the below:

The best way to verify that your pixel tag is present and tracking conversions is to search for the tag ID.
To search for the tag ID within your HTML code, follow the below steps:
Command + F will bring up the search tool in the “Elements” section of the developer tool.
Type or paste the tag ID that you can find in Events Manager under the Tools section.

Please note that if you are using a tag manager (such as Google Tag Manager), you will not be able to find the tag under “Elements” but the tag can still be validated under the “Network” tag in the developer tools.
If you are using a tag manager, you can skip directly to the “Network” validation step below.
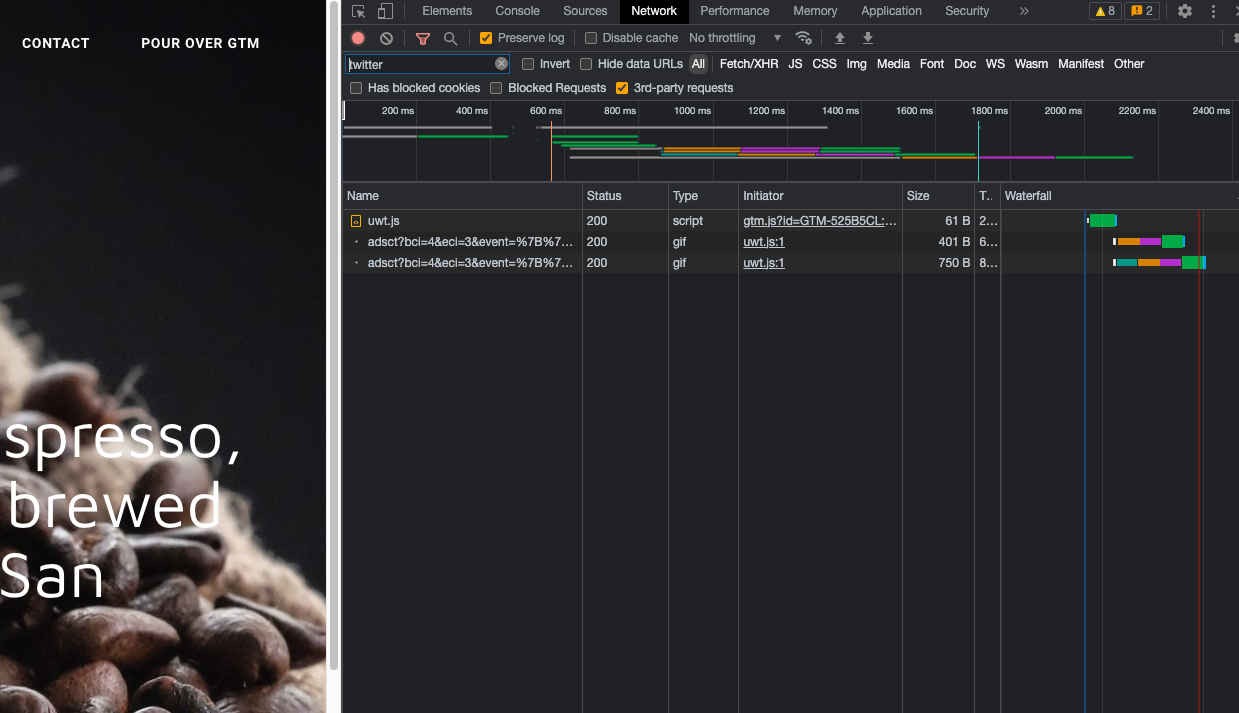
Click on the “Network” tab of the developer tool panel.
Hit Command + R to reload the page.
Search for “X” in the search field to find the pixel tag.
Look for the correct script files on your page: one single uwt.js file should appear, and two adsct files should appear per tag you have on your page. For example, if you have one base tag and two event tags then you should see one uwt.js file and six adsct files.
Ensure that the adsct calls are containing the correct string for each of the tag IDs. You can click on the files individually to find the tag IDs. Each tag ID should have two adsct calls.
The status for all files should read 200.
Reference the below example of what the files will look like for validation purpose:

Common Identified Issues
#1 The Pixel Tag is not reporting my attributed conversions. How can I ensure the pixel tag is capturing all conversions?
This could be caused by the HTML code for the base or event pixel being placed in the wrong location of your website or tag manager system.
If you are not using a tag manager system, ensure that the entire code snippet (base and event tag) is visible in the HTML of the webpage. Refer to our “Validating a Pixel Tag” section for this.
If you are using a container tag/tag management system, this is not something X has visibility into. Please reach out to your third-party partner (e.g. Google Tag Manager) to troubleshoot further.
Note that by installing the base pixel code within the page’s <head> section, this ensures the pixel tag fires quickly as it would be one of the first things to load. If you notice that your pixel tag is installed within an <iframe>, this will also prevent attribution from occurring so placing the tag outside an <iframe> should troubleshoot any attribution issues.
#2 I use floodlight tags to track conversions in Google Campaign Manager 360 (CM360) and am seeing zero or very few conversions being reported in X Ads Manager.
These floodlight tags leverage <iframes>, which often cause the CM360 referrer URLs to be captured rather than the page URLs that are needed for conversion event attribution. To avoid attribution issues across your campaigns, ensure to implement your pixel tag directly on the page so URLs are passed correctly in order to trigger attribution. Piggybacking our pixel off floodlight tags will ultimately cause discrepancies.
If you are using Click Tags, follow the below setup to ensure proper conversion tracking:
Place your Click Tag under “Measurement” on the Ad Group level.
Ensure that no Click Tags are placed on the Ad/Creative level under the landing page URL field.
For additional information on correct CM360 and Click Tag setup, please refer to our help article here.
#3 I see a tag implemented on my website that I am unable to find on my Events Manager.
If you see a different tag ID implemented on your website that is not within your ads manager, it could be because:
The Tag ID is from a different ads account within your organization.
A previous Tag from the correct ads account was implemented, but since deleted in the dashboard.
#4 The pixel network calls have a status of ‘blocked.’ How can I fix it?
If you are using a Content Security Policy application on your website, it is likely that the pixel calls are being blocked by it.
To troubleshoot this issue, ensure that you're allowlisting "ads-twitter.com", "ads-api.twitter.com", and "analytics.twitter.com" in "img-src" and "connect-src" directives within your CSP header in order to continue to see results with the pixel.
#5 My pixel is correctly placed but there is still a highlight alert warning about the pixel health. What else could it be?
We recommend that you check your creative/ad level to ensure that the proper landing page URL is being used. If you are using a different destination URL than your website (such as a click tracker, URL shortener, or a redirect), this will cause the Click ID to break and the pixel will not capture all conversion data.
#6 I took the necessary steps to troubleshoot my pixel. How long until the Account Highlights warning goes away?
The warning on your account should go away between 12 to 24 hours after you troubleshoot your attribution issue.
If you still see a message on your account after taking the necessary steps, please reach out to @AdsSupport or your X representative for assistance.
To learn more about how to set up RDU, please visit the Ads Help portal and file a ticket under Mobile App, Conversion Tracking & Audience Manager >> How to set up Restricted Data Use.
Ready to get started?
